How to Build an Insulation Dam Around the Attic Hatch Opening to Stop Spills
Introduction
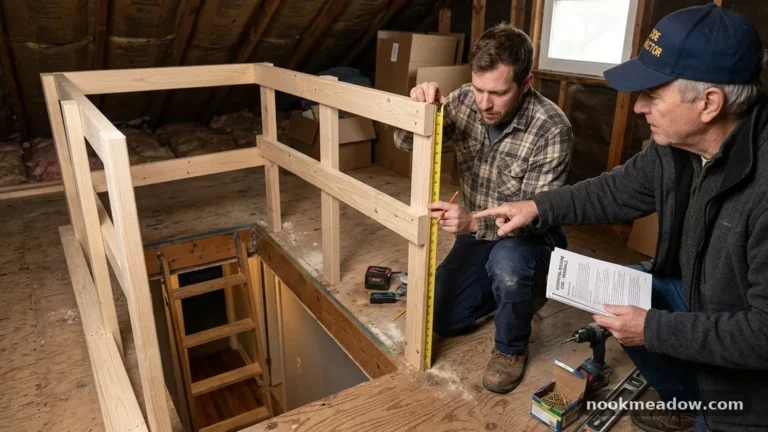
Constructing an attic hatch insulation dam allows for a higher volume of insulation around the hatch perimeter, which significantly reduces convective heat loss in your home. This simple physical barrier prevents loose-fill materials from spilling into your living space whenever you access the attic.
The attic hatch is one of the most common sources of air leakage and heat loss in the home due to the lack of a proper seal. This guide covers how to effectively contain loose-fill insulation, choose the right materials for a durable barrier, and properly seal gaps to improve your home energy efficiency. You will learn the best practices for installing a rigid perimeter around your access opening, ensuring your attic hatch insulation R-value remains consistent with the rest of your ceiling. We focus on reliable methods that prevent thermal bridging while keeping your insulation securely in place for years to come.
Understanding Attic Hatch Dams

The attic hatch is one of the most common sources of air leakage and heat loss in the home due to the lack of a proper seal. This vulnerability often compromises the energy efficiency of the entire structure, as conditioned air escapes into the attic space while unconditioned air enters the living area.
Installing a barrier around the perimeter of your access point is a highly effective way to address this issue. This structure allows for a higher volume of insulation around the hatch perimeter, which significantly reduces convective heat loss. By creating a physical containment zone, you ensure that your thermal envelope remains intact even near these transition points.
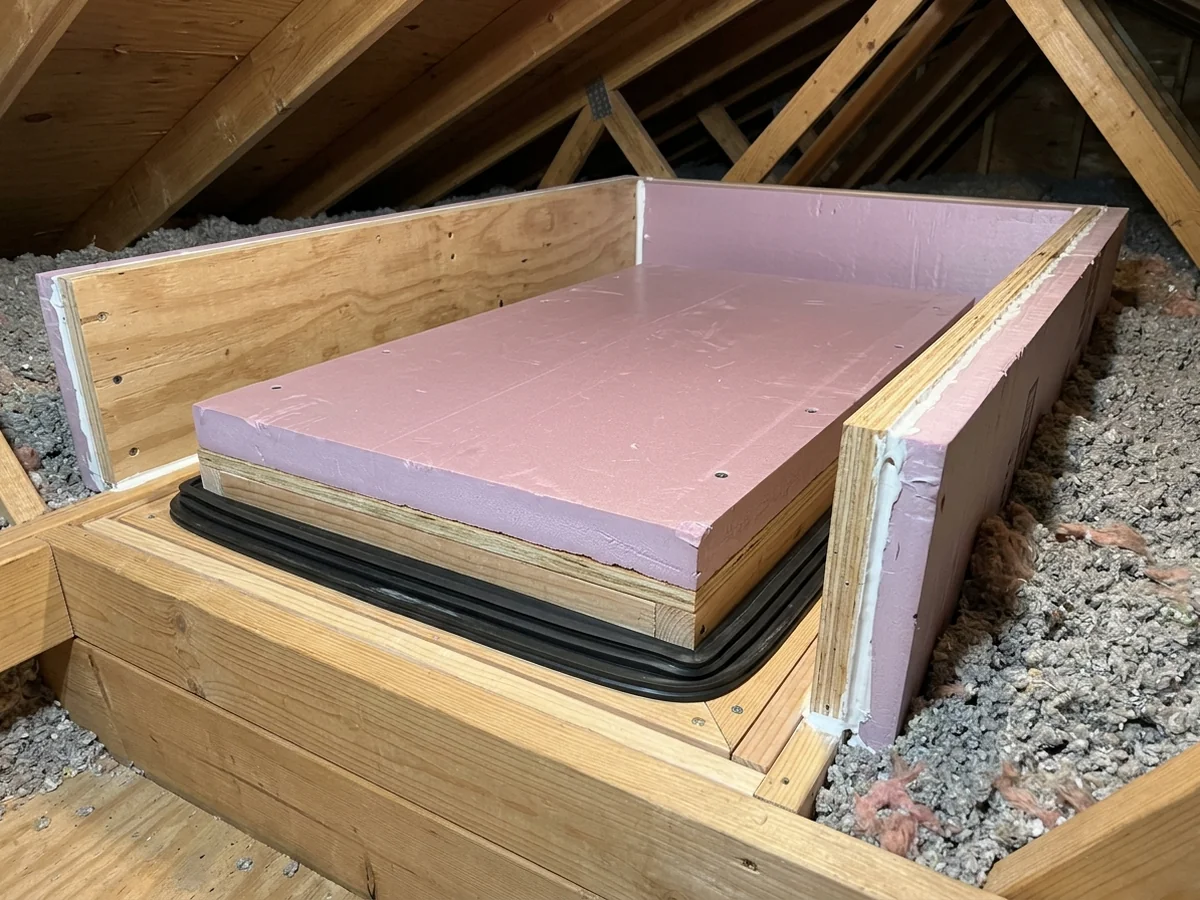
Using a rigid material as a boundary is common guidance for managing loose-fill products like cellulose or fiberglass. Without this support, the material can shift or spill into the opening whenever the hatch is accessed. Rigid foam board is frequently recommended for this purpose because it serves two roles simultaneously:
- It acts as a physical wall to keep loose-fill products from spilling into the hatch area.
- It provides a thermal break when the edges are properly sealed against the surrounding framing.
To ensure the structure stays secure, you should use mechanical fasteners or high-temperature construction adhesives to attach the walls to your attic joists. Once the barrier is in place, you can further improve performance by using spray foam sealant to bridge the gap between the hatch frame and the ceiling drywall. This stops air bypass at the source, preventing drafts from entering through the trim or door edges.
For the best results, remember that your attic access hatch should be insulated to the same R-value as the rest of the ceiling to prevent thermal bridging. While specific requirements vary by location, current Department of Energy guidance for attic insulation typically ranges from R-38 to R-60 depending on your climate zone. Maintaining consistent coverage across the entire ceiling plane is the most effective way to optimize your home thermal performance.
Why Hatches Lose Heat

The attic hatch is one of the most common sources of air leakage and heat loss in the home due to the lack of a proper seal. Because these access points are often poorly fitted, they create a direct pathway for conditioned air to escape into the attic, significantly reducing the overall energy efficiency of your living space.
Thermal bridging occurs when heat moves through conductive materials more easily than through insulated sections of a wall or ceiling. Attic access points are notorious for this because the thin plywood or drywall covers used to seal them lack the necessary resistance to stop heat transfer. When your hatch lacks insulation, it acts as a cold or hot spot that effectively bypasses the thermal envelope of your home.
To prevent this, attic access hatches should be insulated to the same R-value as the rest of the attic ceiling. Common guidance from the Department of Energy suggests that these R-values vary by climate zone, typically ranging from R-38 to R-60. By maintaining a consistent level of thermal resistance across the entire attic floor, you eliminate weak points where energy loss is most concentrated.
Loose-fill insulation, such as blown-in cellulose or fiberglass, requires a rigid barrier to prevent the material from settling into the hatch opening. Typical practice involves using rigid foam board to provide both a physical stop for the insulation and a necessary thermal break when the edges are properly sealed. Installing a dam allows for a higher volume of insulation around the hatch perimeter, which significantly reduces convective heat loss.
When securing these structures, professionals rely on specific techniques to ensure durability. You should use mechanical fasteners or high-temperature construction adhesives to secure dam walls firmly to the attic joists. Additionally, spray foam sealant can be used to bridge the gap between the hatch frame and ceiling drywall to stop air bypass. Taking these steps ensures your home remains comfortable while minimizing energy waste throughout the seasons.
How Insulation Dams Work

Installing a dam allows for a higher volume of insulation around the hatch perimeter, which significantly reduces convective heat loss. By creating a physical boundary, this structure stops loose-fill materials from spilling into the access area whenever the hatch is opened.
The attic hatch is one of the most common sources of air leakage and heat loss in the home due to the lack of a proper seal. Because loose-fill insulation, such as blown-in cellulose or fiberglass, is prone to shifting, it typically requires a rigid structure to prevent it from settling into the opening. An attic hatch insulation dam serves this purpose by maintaining the necessary insulation depth right up to the edge of the access point.
Rigid foam board is a common choice for creating this boundary. When edges are properly sealed, this material acts as a dual-purpose component:
- It functions as a physical barrier for preventing loose fill insulation spill.
- It provides a thermal break to reduce heat transfer through the hatch frame.
For the best results, remember that attic access hatches should be insulated to the same R-value as the rest of the attic ceiling to prevent thermal bridging. While specific recommendations from the Department of Energy suggest R-values ranging from R-38 to R-60 depending on your climate zone, the dam ensures your insulation remains consistent across the entire attic floor. To secure these barriers effectively, use mechanical fasteners or high-temperature construction adhesives to attach the walls directly to the attic joists.
If you notice persistent drafts, consider that spray foam sealant can be used to bridge the gap between the hatch frame and ceiling drywall to stop air bypass. This combined approach of creating a rigid barrier and sealing air leaks ensures that the area around your attic access remains as thermally efficient as the rest of your home.
Dam Materials and Construction
Building a sturdy barrier around your access point is essential for preventing loose-fill insulation from spilling into your living space whenever the hatch is opened. Using the right materials ensures that this enclosure remains rigid and effective over time. Common guidance suggests that loose-fill insulation, such as blown-in cellulose or fiberglass, requires a rigid dam to prevent settling into the hatch opening.
When selecting materials, prioritize options that provide structural integrity and help maintain thermal performance. Rigid foam board is frequently cited as a preferred choice because it serves as both a physical barrier and a thermal break when the edges are properly sealed. Alternatively, plywood offers a durable, solid frame that can withstand the pressure of deep insulation blankets. Regardless of the material, installing a dam allows for a higher volume of insulation around the hatch perimeter, which significantly reduces convective heat loss.
To ensure your DIY insulation dam installation remains secure and airtight, follow these structural best practices:
- Select rigid foam board or plywood, as these materials effectively contain loose insulation while maintaining their shape.
- Use mechanical fasteners or high-temperature construction adhesives to securely attach the dam walls to your attic joists.
- Ensure the barrier is tall enough to contain the surrounding insulation depth to prevent any material from migrating into the opening.
- Seal any gaps between the dam and the attic floor using spray foam sealant to prevent air bypass.
- Consider the long-term durability of your chosen materials, as they must withstand significant temperature fluctuations in the attic environment.
The attic hatch is one of the most common sources of air leakage and heat loss in the home due to the lack of a proper seal. By constructing a robust enclosure, you protect your home from unwanted drafts and maintain the efficiency of your thermal envelope. Remember that attic access hatches should be insulated to the same R-value as the rest of the attic ceiling to prevent thermal bridging, with Department of Energy recommendations typically ranging from R-38 to R-60 depending on your climate zone.
Improving the Air Seal

The attic hatch is one of the most common sources of air leakage and heat loss in the home due to the lack of a proper seal. Properly addressing the gap between the hatch frame and the ceiling drywall is essential for maintaining your home’s thermal envelope and preventing drafts from moving through the opening.
To stop air bypass, spray foam sealant can be used to bridge the gap between the hatch frame and the ceiling drywall. This material effectively fills irregular spaces where the framing meets the ceiling, preventing conditioned air from escaping into the attic space. Once this gap is sealed, it is important to ensure the perimeter of the hatch remains airtight during regular use.
Applying weatherstripping to the hatch frame creates an airtight seal around the perimeter when the door is closed. This simple addition ensures that the hatch fits snugly against its frame, preventing air leakage that often occurs at these transition points. When combined with a robust barrier, this step significantly improves your overall attic hatch air sealing efforts.
Consider these points for a comprehensive finish:
- Attic access hatches should be insulated to the same R-value as the rest of the attic ceiling to prevent thermal bridging.
- Installing a dam allows for a higher volume of insulation around the hatch perimeter, which significantly reduces convective heat loss.
- Mechanical fasteners or high-temperature construction adhesives are recommended for securing dam walls to attic floor joists.
Following these practices ensures that your insulation remains contained while providing a consistent thermal barrier across your ceiling. By focusing on both the perimeter seal and the containment structure, you address the primary pathways for energy loss in this part of your home.
Common Installation Mistakes

The attic hatch is one of the most common sources of air leakage and heat loss in the home due to the lack of a proper seal. When creating a barrier to hold back loose-fill materials, homeowners often overlook critical details that compromise long-term energy efficiency.
- Using low-quality adhesives that fail under extreme attic temperatures can cause the structure to detach, leaving your hatch vulnerable to insulation spills.
- Mechanical fasteners or high-temperature construction adhesives are recommended for securing dam walls to attic joists to ensure the assembly remains rigid over time.
- Failing to use spray foam sealant to bridge the gap between the hatch frame and ceiling drywall allows air to bypass your insulation layer, undermining the entire project.
- Neglecting to insulate the hatch door itself to the same R-value as the rest of the attic ceiling leads to significant thermal bridging, which can range from R-38 to R-60 depending on your climate zone.
- Assuming a simple barrier is enough without checking for small gaps can lead to continuous air movement, which often results in convective heat loss through the access point.
It is important to remember that installing a dam allows for a higher volume of insulation around the hatch perimeter, which significantly reduces convective heat loss. Common guidance suggests using a rigid foam board to create this physical barrier, as it provides both a structural wall and a thermal break when the edges are properly sealed. Always prioritize material durability and airtight connections to ensure your home remains thermally efficient throughout the changing seasons.
Climate Considerations and R-Values

Your regional climate significantly influences the thermal performance required for your home, meaning insulation needs are never one size fits all. The attic hatch is one of the most common sources of air leakage and heat loss in the home due to the lack of a proper seal. To maintain energy efficiency, attic access hatches should be insulated to the same R-value as the rest of the attic ceiling to prevent thermal bridging.
While the US Department of Energy typically recommends R-values ranging from R-38 to R-60, these figures vary by climate zone. You should always consult local building codes or the International Residential Code to determine the precise attic access hatch insulation R-value required for your specific geographic location. Ensuring your hatch matches the surrounding ceiling insulation is a critical step in creating a uniform thermal envelope.
When working with loose-fill insulation, such as cellulose or fiberglass, common guidance suggests using a rigid dam to prevent the material from settling into the hatch opening. Installing a dam allows for a higher volume of insulation around the hatch perimeter, which significantly reduces convective heat loss. As a typical practice, rigid foam board provides both a physical barrier for loose-fill insulation and a thermal break when edges are properly sealed. To secure these dam walls to attic joists, use mechanical fasteners or high-temperature construction adhesives.
| Factor | Consideration |
|---|---|
| Thermal Uniformity | Match hatch R-value to ceiling R-value |
| Air Leakage | Hatch is a primary point of heat loss |
| Common Practice | Use rigid foam board as a dam |
| Installation Tip | Use spray foam sealant to bridge gaps |
A frequent mistake during DIY insulation dam installation is failing to address the gap between the hatch frame and the ceiling drywall. Spray foam sealant can be used to bridge this space and stop air bypass, which is essential for effective attic hatch air sealing. By creating a rigid barrier, you prevent loose-fill insulation spill and ensure the hatch remains a well-insulated, airtight component of your home structure. Always verify that your chosen materials are compatible with local fire safety standards before installation.
When to Hire Professionals

You should consider bringing in a professional if your attic access point is located in an area that is physically inaccessible or if you identify structural damage to the framing. While many homeowners manage basic air sealing projects, certain conditions require the expertise of a contractor to ensure both safety and long-term effectiveness.
Attempting to work in extremely cramped or hard-to-reach attic spaces often increases the risk of injury and complicates the installation process. If the space is too narrow to maneuver safely, or if you cannot reach the joists without compromising your balance or stability, it is best to consult a professional. Professionals have the specialized equipment and experience to navigate tight crawl spaces while maintaining the integrity of the insulation barrier.
You should also seek expert assistance if you discover that your attic joists are damaged, sagging, or structurally compromised. Because the attic hatch frame must be securely attached to these joists to remain functional, attempting to install a barrier on damaged wood can lead to further structural failure or an improper seal. A contractor can assess whether the framing requires reinforcement before any air sealing or dam construction begins.
Complex air sealing tasks sometimes require specialized equipment to achieve the necessary results. If your project involves sealing significant gaps where the hatch frame meets the ceiling drywall, or if you are unsure how to handle electrical wiring or other obstructions around the opening, professional guidance is recommended. Experts can ensure that air bypass is effectively stopped while adhering to safety standards for your home.
- Structural damage to attic joists or ceiling framing.
- Extremely limited access or cramped work environments that pose a safety risk.
- Complex gaps requiring professional-grade spray foam sealant application.
- Concerns regarding electrical components or pipes near the access point.
- Difficulty achieving a consistent seal due to non-standard or oversized hatch dimensions.
FAQ
Why does my attic hatch leak air?
The attic hatch is one of the most common sources of air leakage and heat loss in the home due to the lack of a proper seal. This gap often exists because the hatch frame does not meet the ceiling drywall tightly, allowing conditioned air to escape into the attic space.
How do I keep loose insulation from falling into the house?
Using a rigid foam board attic barrier is the typical practice for preventing loose-fill insulation from settling into the hatch opening. Installing a dam allows for a higher volume of insulation around the hatch perimeter, which significantly reduces convective heat loss.
What materials are best for building an attic insulation dam?
Rigid foam board provides both a physical barrier for loose-fill insulation and a thermal break when edges are sealed. Mechanical fasteners or high-temperature construction adhesives are recommended for securing these dam walls to attic joists.
Do I need to insulate the attic hatch door itself?
Attic access hatches should be insulated to the same R-value as the rest of the attic ceiling to prevent thermal bridging. While common guidance suggests Department of Energy recommendations range from R-38 to R-60 depending on your climate zone, the hatch must match the specific rating of your surrounding attic insulation to be effective.
How do I stop air bypass around the hatch frame?
Spray foam sealant can be used to bridge the gap between the hatch frame and ceiling drywall to stop air bypass. This creates a continuous, airtight seal that prevents drafts from entering your living space through the access point.
Conclusion
The attic hatch is one of the most common sources of air leakage and heat loss in the home due to the lack of a proper seal. By installing an attic hatch insulation dam, you successfully create a physical barrier that prevents loose-fill material from migrating into the opening while enabling higher insulation levels around the perimeter. Once the dam is securely fastened to the attic joists with mechanical fasteners or high-temperature adhesives, your next step is to ensure the hatch itself is insulated to the same R-value as the rest of the ceiling. This final measure completes the thermal boundary and maximizes your home energy efficiency.
Sources: docs.nlr.gov, basc.pnnl.gov, housing.az.gov, energystar.gov
You might also like: How to Adjust the Tension Springs on an Attic Hatch Door That Won̵